Aug 18, 2025
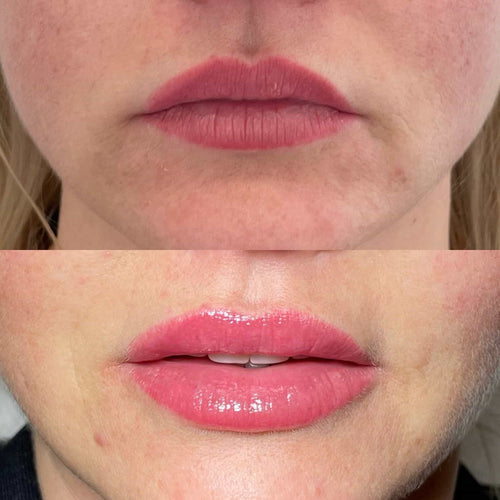
How Much Lip Filler Do I Need
Schedule a Dermal Filler Appointment with Dr. Laura Geige Now

Understanding Your Lip Filler Dosage
To understand how much lip filler you need, it’s essential to consider several factors that can affect the dosage and outcome of the treatment.
The amount of lip filler required depends on various individual characteristics, such as the desired shape, size, and fullness of your lips.
Firstly, your natural lip shape and size will play a significant role in determining the ideal amount of filler needed. If you have smaller lips, you may require less filler to achieve the desired appearance, while those with larger lips may need more.
The type of filler used is also crucial in determining the dosage required. Different types of fillers have varying viscosities and densities, which affect how they distribute and hold their shape under the skin.
For example, hyaluronic acid fillers like Juvederm or Restylane tend to be more fluid and can be used in smaller amounts, while thicker fillers like calcium hydroxylapatite may require more filler to achieve the same result.
Another factor to consider is the location of the filler injection. The lip area is particularly delicate, and excessive filler can lead to unevenness, swelling, or even temporary numbness.
The injector’s expertise and experience also come into play when determining the ideal dosage. A skilled practitioner will take into account your individual features, lip shape, and desired outcome to ensure a natural-looking result.
Additionally, the age and health of your skin can impact how much filler is required. Older skin may require less filler due to decreased collagen production, while younger skin can often handle more filler without looking unnatural.
Medical history, lifestyle habits, and even medications can also influence lip filler dosage. For instance, those taking blood thinners or having autoimmune disorders may require adjustments to the treatment plan to minimize risks.
The volume of lip filler needed will vary from person to person, and it’s crucial to have a thorough consultation with a qualified practitioner to determine the optimal amount for your specific situation.
During your appointment, your injector will assess your lips using 3D imaging or measuring techniques to ensure accurate placement and dosage. This allows them to customize the treatment to meet your unique needs and achieve a natural-looking result.
A general rule of thumb is to start with a small amount (usually 0.5-1cc) and adjust as needed, rather than injecting too much filler upfront. This approach enables you to achieve the desired look without looking unnatural or over-filled.
It’s also essential to maintain realistic expectations regarding lip filler dosage. Over-filling can lead to complications like swelling, bruising, or lip asymmetry, while under-filling may result in a less-than-desirable appearance.
To ensure long-term satisfaction with your lip filler treatment, it’s vital to follow your injector’s aftercare instructions and schedule regular maintenance appointments to maintain the desired shape and fullness.
The key to achieving the desired shape with lip fillers is understanding the dosage and how it will affect the final result.
When selecting a lip filler, it’s essential to consider the amount of product needed to achieve the desired shape and size.
Lip Filler Dosage Guidelines:
- For a natural-looking enhancement, use 1-2 units per side (0.05-0.10 ml) of hyaluronic acid fillers for the lower lip and 0.5-1 unit per side (0.025-0.05 ml) for the upper lip.
- For a more dramatic enhancement, use 3-4 units per side (0.15-0.20 ml) of hyaluronic acid fillers for the lower lip and 1-2 units per side (0.05-0.10 ml) for the upper lip.
It’s crucial to note that these are general guidelines, and the optimal dosage will vary depending on individual factors such as:
Individual Lip Anatomy:
- The shape and size of the mouth, including the cupid’s bow, vermilion border, and lip volume.
- The desired level of enhancement, from subtle to dramatic.
Lip Filler Type:
- Each type of filler has a different consistency and viscosity, which can affect the final result.
- Hyaluronic acid fillers are generally considered more versatile than other types of fillers.
Consider the following factors when determining your desired shape:
Lip Contour:
- The Cupid’s bow: The curve of the upper lip that forms the shape of a heart. A higher cupid’s bow can create a more defined, feminine lip shape.
- The Vermilion border: The pinkish-colored area at the edge of the lips. A defined vermilion border can add depth and dimension to the lip shape.
Lip Volume:
- A fuller lip volume can create a more luscious, pouty appearance.
- A thinner lip volume can result in a more subtle, natural-looking enhancement.
Personal Preferences:
- Consider your personal style and preferences when determining the desired shape.
- Do you prefer a more subtle, natural-looking enhancement or something more dramatic?
A consultation with an experienced healthcare professional or dermatologist can help determine the optimal dosage and desired shape for achieving your ideal lip look.
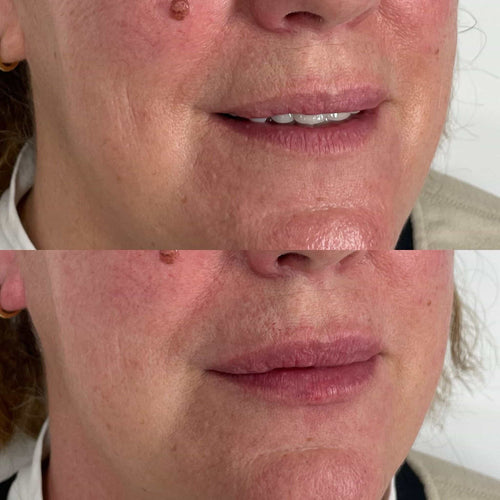
Lip fillers are a popular cosmetic treatment used to enhance the appearance of the lips by adding volume, shape, and contours.
However, determining the right dosage of lip filler can be challenging, as it depends on individual factors such as lip shape, desired outcome, and personal preferences.
According to the American Society of Plastic Surgeons, the ideal lip volume varies from person to person, making it essential to consult with a qualified practitioner to determine the perfect dosage for your lips.
A consultation with a skilled practitioner will allow you to discuss your lip shape, desired outcome, and any concerns you may have, enabling them to assess your unique needs and recommend a tailored treatment plan.
During the consultation, your practitioner will evaluate the size and proportions of your lips, taking into account factors such as the natural curves, contours, and spacing between the lips.
They will also discuss with you your desired outcome, whether it’s to enhance the lip’s appearance by adding volume, creating a more defined Cupid’s bow, or correcting asymmetry.
Based on the evaluation and discussion, your practitioner will recommend an appropriate dosage of lip filler, considering factors such as the type and brand of filler used, the individual’s skin type and condition, and any allergies or sensitivities.
Some common dosages for lip fillers include:
– 1-2 mL for subtle augmentation
– 3-4 mL for moderate enhancement
– 5-6 mL for more pronounced results
However, these are general guidelines, and the right dosage will depend on your individual needs and goals.
A skilled practitioner will use their expertise to measure the lip area and calculate the optimal dosage of filler required, ensuring a natural-looking result that complements your unique features.
It’s also essential to note that overfilling can lead to an unnatural appearance, so it’s crucial to work with a qualified practitioner who has experience in lip fillers and can provide guidance on achieving the desired results.
By consulting with a qualified practitioner and discussing your individual needs and goals, you can achieve a beautifully enhanced lip shape that complements your features and makes you feel confident and beautiful.
To determine the optimal dosage, concentration, and volume of lip filler needed for a specific individual, it’s essential to understand the various factors at play.
The dosage of lip filler refers to the amount of product injected into the lips, measured in units such as milliliters (mL) or cubic centimeters (cm³). A common starting point for lip filler dosing is between 1-2 mL per side, but this can vary depending on individual anatomical features and desired outcomes.
Lip filler concentration, on the other hand, refers to the product’s viscosity or thickness. It’s usually measured in terms of hyaluronic acid (HA) concentration, which ranges from low to high. Common HA concentrations include:
- Low concentration: 10-25 mg/mL – best suited for patients with mild lip augmentation needs and sensitive skin.
- Moderate concentration: 25-40 mg/mL – a good all-purpose choice for most lip filler applications.
- High concentration: 40-60 mg/mL – recommended for patients who require more significant lip enhancements or have thinner lips.
Arrange Your Dermal Filler Session with Dr. Laura Geige
The volume calculation of lip filler involves determining the amount of product needed to achieve the desired outcome. This is typically done using a combination of clinical experience, imaging techniques (such as 3D scanning), and patient consultations. The goal is to create a natural-looking, symmetrical appearance that enhances facial features without appearing overly injected or unnatural.
A common approach to volume calculation involves using the following guidelines:
- Upper lip augmentation: 0.5-1 mL per side for subtle definition, 1-2 mL per side for moderate enhancement.
- Lower lip augmentation: 0.25-0.75 mL per side for subtle definition, 0.75-1.5 mL per side for moderate enhancement.
In terms of specific calculations, the following formulas can be used to estimate volume needs:
A rough estimate for upper lip volume can be calculated using the formula: Upper Lip Volume = (Upper Lip Length x Upper Lip Width) x 0.5-1 mL/cm³
The lower lip’s volume can be estimated as follows: Lower Lip Volume = (Lower Lip Length x Lower Lip Width) x 0.25-0.75 mL/cm³
For example, if the upper lip measures approximately 15 cm in length and 8 cm in width, and you’re using a moderate HA concentration (35 mg/mL), the estimated volume would be:
Upper Lip Volume ≈ (15 cm x 8 cm) x 0.75 mL/cm³ = 108 mL
This means that approximately 108 mL of lip filler product with the specified HA concentration might be needed for optimal upper lip augmentation.
Keep in mind that these calculations are rough estimates, and actual volume needs may vary depending on individual factors such as lip anatomy, facial features, and desired outcomes. A qualified healthcare professional will assess your specific needs through a comprehensive evaluation and provide personalized recommendations for the best possible results.
Understanding your lip filler dosage and concentration requires careful consideration to achieve the desired results while minimizing potential risks and side effects.
To determine the right amount of lip filler for you, it’s essential to consider several factors, including:
-
The type and brand of filler used
-
Your skin type and condition
-
The desired shape, size, and fullness of your lips
-
The skill level and experience of the practitioner administering the filler
Concentration calculations play a crucial role in determining the correct dosage of lip filler. The concentration of hyaluronic acid (HA) or other fillers varies between brands and types, ranging from 5-30 mg/mL.
Here’s a general guide to help you understand concentration calculations:
-
A lower concentration (e.g., 10mg/mL) is usually used for temporary fillers or those with a shorter duration of action.
-
A moderate concentration (e.g., 20mg/mL) is often used for most lip filler applications, providing a balance between durability and potential side effects.
-
A higher concentration (e.g., 30mg/mL) may be necessary for more prominent or longer-lasting results, but it also increases the risk of side effects, such as swelling, bruising, or scarring.
When calculating your lip filler dosage, consider the following factors:
-
The volume of each syringe (usually 1cc or 2cc)
-
The desired fill level (e.g., subtle enhancement, moderate augmentation, or full lip shape correction)
-
Your individual anatomy and facial features
To give you a better understanding of the dosage, here’s a rough estimate of lip filler volumes for common applications:
-
Subtle enhancement (1-2cc): perfect for those with naturally thin lips or who want to refine their existing shape.
-
Moderate augmentation (2-4cc): suitable for most lip filler applications, providing a noticeable but still natural-looking fullness.
-
Fullder lip shape correction (4-6cc or more): ideal for those seeking a more dramatic change in lip shape or size.
Remember that these are general guidelines and may vary depending on individual factors, such as your skin condition, lip anatomy, and desired outcome. It’s essential to consult with an experienced practitioner to determine the optimal dosage and concentration of lip filler for your specific needs.
The quest for luscious, plump lips can be a daunting task, especially when it comes to determining the perfect dosage of lip fillers. Understanding your individual needs is crucial to achieving desirable results without overfilling or underfilling your lips.
A study published in the Journal of Clinical and Aesthetic Dermatology sheds light on the importance of lip filler concentration in relation to volume requirements. The research suggests that a higher concentration, typically between 10-20 mg/mL, may necessitate less volume to achieve the desired results.
This concept is rooted in the idea that thicker fillers tend to have fewer particles per unit weight compared to thinner fillers. As a result, more concentrated fillers can provide greater durability and longer-lasting effects with reduced volumes.
For instance, if you’re considering using a higher concentration of hyaluronic acid-based filler, such as _Hyaluronic Acid_ (HA), it’s likely that less volume will be required to achieve the same level of plumping and augmentation as compared to a lower concentration.
However, it’s essential to note that the optimal lip filler dosage also depends on various factors, including your individual skin type, lip anatomy, and desired outcome. A consultation with an experienced healthcare professional or dermatologist can help determine the most suitable dosage and technique for your specific needs.
The _FDA_ has approved several types of lip fillers, such as _Radiesse_, _Juvederm_, and _Restylane_. Each of these products has its own unique characteristics, including varying concentrations and particle sizes. Understanding the specific properties of each filler can aid in making informed decisions about dosage and volume requirements.
Arrange a Consultation for Dermal Fillers with Dr. Laura Geige at It’s Me and You Clinic
Additionally, the technique employed during the procedure also plays a significant role in determining the final outcome. Factors such as injection angle, pressure, and movement can greatly impact the distribution and absorption of fillers within the lip tissue.
To ensure optimal results, it’s crucial to work with an experienced provider who has a deep understanding of lip filler dosage, anatomy, and technique. A thorough assessment of your individual needs will help prevent overfilling or underfilling, resulting in more natural-looking and longer-lasting results.
In conclusion, the ideal lip filler dosage is highly dependent on various factors, including concentration, skin type, and desired outcome. By understanding these intricacies and working with a skilled provider, you can achieve the luscious, plump lips that have always been your dream.
Lip fillers are a popular cosmetic treatment used to enhance the appearance of the lips by adding volume, shape, and smoothness. However, determining the right dosage and technique can be challenging, especially for those who have never had lip filler injections before.
To ensure safe and effective results, it’s essential to understand how to calculate your lip filler dosage based on your natural lip size. Here are some guidelines to follow:
-
Measure the length and width of your lips by placing a piece of paper or a ruler against them while they’re relaxed.
-
Calculate the surface area of your lips by multiplying their length and width together. A general rule of thumb is to use a surface area that’s equivalent to about 1/3 of the full mouth.
-
Determine your desired lip volume, taking into account the amount of filler you want to add to each quadrant (top, bottom, left, and right) of your lips.
Here’s a rough guide to help you estimate your lip filler dosage based on your natural lip size:
-
* For small to medium-sized lips (surface area around 1-2 cm^2): 1-2 mL of hyaluronic acid gel or similar filler.
-
* For medium-sized lips (surface area around 2-4 cm^2): 2-3 mL of hyaluronic acid gel or similar filler.
-
* For large lips (surface area around 4-6 cm^2): 3-4 mL of hyaluronic acid gel or similar filler.
It’s also essential to consider the type of filler you’re using and its unique properties. For example:
-
* Permanent fillers, like silicone or calcium hydroxylapatite, are typically used in larger quantities (around 4-6 mL) due to their long-lasting effects.
-
* Temporary fillers, like hyaluronic acid gel, usually require smaller amounts (around 1-3 mL) since they wear off over time.
Additionally, keep in mind that lip filler dosage and technique can vary depending on your individual anatomy, such as:
-
* Lip shape and size variations: More filler may be needed to achieve the desired symmetry.
-
* Lip scarring or irregularities: Additional fillers or specialized techniques might be required to address these issues.
It’s crucial to consult with a licensed practitioner who has experience in administering lip fillers. They can assess your individual needs and provide personalized guidance on the optimal dosage and technique for your specific case.
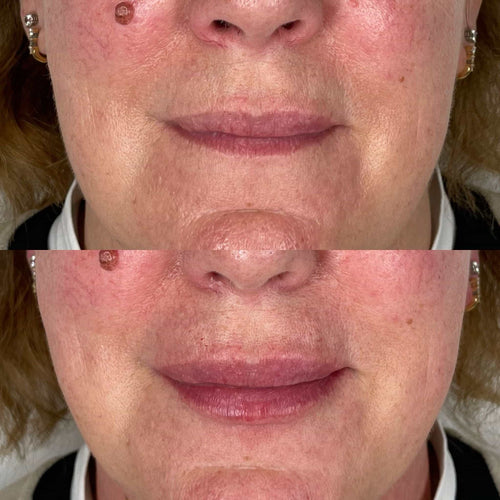
Understanding Your Lip Filler Dosage is crucial to achieve natural-looking results that last throughout the day. The key to determining the right amount of lip filler lies in understanding the volume and shape of your individual lips.
The University of California, Los Angeles (UCLA) Plastic Surgery Department recommends calculating lip filler volume based on individual lip size. By taking into account the unique characteristics of your mouth, you can ensure that your lip filler is tailored to perfection, resulting in a more balanced and harmonious smile.
For females, a typical lip measurement is around 67 cm (26.4 inches) in length and 34 cm (13.4 inches) in width. However, it’s essential to note that these are general guidelines and may vary depending on your personal features and preferences.
- Measure the natural curve of your lips by placing a ruler or a lip liner along the edge of your mouth from one side to the other.
- Take note of the width of your lips at their widest point, usually just above the Cupid’s bow (the curved shape that forms between the nose and upper lip).
- Determine the desired fullness level for your lips by considering your individual anatomy, facial features, and personal style.
When calculating lip filler volume, it’s recommended to consider the following general guidelines:
- a small lip size: 1-2 cc (0.04-0.08 fl oz) per lip for subtle enhancement and natural-looking results.
- a medium lip size: 2-3 cc (0.08-0.11 fl oz) per lip for moderate enhancement and a balanced appearance.
- a large lip size: 3-4 cc (0.11-0.14 fl oz) per lip for more pronounced features and dramatic results.
It’s also important to note that the type of filler used, such as hyaluronic acid or calcium hydroxylapatite, may require different dosages due to variations in absorption rates and longevity. Your healthcare provider will be able to guide you on the most suitable treatment plan based on your individual needs.
Aftercare is also an essential aspect of lip filler recovery. It’s recommended to avoid excessive lip biting, smoking, or drinking for at least 24 hours after treatment. Keeping your lips moisturized and protected with a gentle lip balm can help minimize any temporary side effects, such as swelling, bruising, or discomfort.
By understanding your individual lip size and calculating the right dosage of lip filler, you can achieve a more harmonious balance between natural-looking fullness and subtle enhancement. A consultation with a qualified healthcare professional will enable you to create a personalized treatment plan tailored to your unique needs and desired outcomes.
Choosing the Right Lip Filler Volume
When it comes to choosing the right lip filler volume, there are several factors to consider to achieve a natural-looking and long-lasting result.
The first step is to determine what you’re trying to achieve with your lip fillers. Are you looking for a subtle enhancement or a more dramatic transformation? Different volumes of lip fillers can provide varying levels of augmentation.
A
A (around 3-4 mm) is often recommended as a standard for those who want to achieve a more voluptuous pout. This volume provides a noticeable augmentation without looking too oversized or unnatural.
A larger volume (over 5 mm) is usually reserved for individuals with significantly thin or Cupid’s bow-less lips, or those who have lost lip volume due to aging or certain medical conditions. Be cautious when selecting this option, as excessive volume can lead to an unnatural appearance.
It’s also essential to consider the type of filler used, as different properties will affect how it interacts with your skin and the natural shape of your lips.
Lip fillers with a
Filinders with a medium-acting formula provide longer-lasting results, usually spanning 6-12 months. These products offer more stability and durability but may still require periodic touch-ups to maintain the desired shape.
Lip fillers with a long-acting formula are best suited for those who want permanent results or significant augmentation. These products can last anywhere from 1-2 years or more, depending on individual factors and filler properties.
When choosing the right lip filler volume, it’s also crucial to consider your personal preferences, skin type, and lip anatomy. A
A consultation with a qualified healthcare professional or board-certified dermatologist is highly recommended to determine the optimal volume and type of filler for your individual needs. They will assess your lips, skin, and overall health to provide personalized recommendations.
During the consultation, be prepared to discuss your expectations, lip concerns, and any medical history that may impact treatment outcomes. This will enable you to make an informed decision about the right lip filler volume for a natural-looking and long-lasting result.
A topical anesthesia or numbing cream can also help minimize discomfort during the procedure, making it more comfortable and tolerable. However, some patients may still experience minor side effects such as redness, swelling, or bruising around the treated area.
With careful consideration of your lip filler volume and the right type of product for your needs, you can achieve a beautiful, natural-looking pout that enhances your appearance without compromising your comfort or health.
Remember to always prioritize aftercare to ensure optimal results. Follow your healthcare professional’s instructions carefully, and avoid activities that may compromise the treated area during the initial healing phase.
A well-informed decision and a thorough understanding of the treatment process will lead to a more satisfying outcome and enhance your overall lip filler experience.
The key is to find the right balance between augmentation and naturalness. With the help of a qualified professional, you can choose the perfect lip filler volume for a stunning, long-lasting result that enhances your unique features.
The key to successful lip filler treatment lies in choosing the right volume for individual patient needs, taking into consideration their desired outcome, facial structure, and personal style.
A common mistake is selecting a filler volume that is too high or too low, which can result in an unnatural appearance or insufficient results. To determine the ideal volume, it’s essential to understand how fillers work and the differences between various products.
Dermal fillers with high water content, such as hyaluronic acid (HA) fillers like Restylane, Belotero, and Juvederm Ultra XC, are popular choices due to their natural texture and ability to mimic the body’s own collagen and elastin.
HA fillers are composed of approximately 90-95% water, making them an excellent option for those seeking a more subtle enhancement. They are also highly biocompatible, allowing them to easily integrate with the surrounding tissue and minimize the risk of complications.
A well-informed healthcare professional will typically assess the patient’s lips using a lip volumizer or lip injector before selecting the most suitable filler and volume. This ensures a precise application that meets individual needs.
For most patients, a starting point for lip filler volume is between 1-2 mm of product injected into each lip. However, this can vary depending on factors such as the patient’s desired outcome, lip shape, and facial structure.
Thin-lipped individuals may require slightly more volume to achieve a balanced appearance, while those with fuller lips might prefer a smaller amount to avoid looking over-filled.
A 1-2 mm application of filler is considered moderate and provides a natural-looking enhancement without appearing too dramatic or noticeable. Over-injection can lead to an unnatural appearance, while under-injection may result in insufficient volume.
It’s also essential to consider the type of filler used for lip augmentation. For example, calcium-based fillers like Radiesse are often preferred for deeper injections and provide a more prolonged effect due to their larger molecular size and higher density.
On the other hand, HA fillers are typically used for superficial applications, as they are less dense and can be easily absorbed by the body if excessive amounts are injected.
A customized approach to lip filler treatment requires careful consideration of individual patient needs and preferences. A skilled healthcare professional will work with the patient to determine the most effective volume and filler choice, ensuring optimal results and minimizing potential complications.
The key to achieving a natural-looking lip filler result lies in choosing the right volume, and one factor to consider is the type of filler used.
Products containing hyaluronic acid, such as Restylane and Juvederm, tend to be more forgiving in terms of volume because they are less likely to cause significant scarring or irregularities.
This is due to the unique properties of hyaluronic acid, which allows it to retain its shape and structure within the body for a longer period, making it more adaptable to varying tissue types and conditions.
As per the FDA guidelines, hyaluronic acid-based fillers can provide up to 50% more volume than expected, providing a safe margin for error in terms of placement and distribution.
This is especially important when selecting the right lip filler volume, as overfilling can lead to an unnatural or puffy appearance, while underfilling may not provide sufficient augmentation.
On the other hand, fillers that do not contain hyaluronic acid, such as collagen or calcium hydroxylapatite-based products, tend to have a more precise and predictable outcome, but can be less forgiving in terms of volume, requiring more accurate measurements and calculations.
A well-trained healthcare professional will typically use their expertise and clinical judgment to determine the optimal filler volume based on individual factors such as the patient’s desired outcome, lip shape and size, skin elasticity, and the overall aesthetic goals of the procedure.
Additionally, it is essential to note that hyaluronic acid fillers can be dissolved with a simple treatment called an “injection dissolver” if they do not meet the expected results, providing a safe and effective solution for correction or removal.
To ensure accurate filler placement and optimal volume results, patients are often provided with detailed after-treatment instructions, which may include specific guidelines on food intake, hydration levels, and follow-up appointments to monitor progress.
Furthermore, modern lip filler technology has made significant advancements in recent years, offering a range of products with varying viscosities and formulations designed to address specific concerns or aesthetic goals, such as subtle volume enhancement, dramatic augmentation, or refinement of the lip shape.
A qualified healthcare professional will assess each patient’s unique needs and preferences to recommend the most suitable filler product and technique for achieving optimal results.
Lip fillers are a popular cosmetic treatment used to enhance the shape and size of the lips, but choosing the right volume can be a challenge. The ideal lip filler volume depends on individual facial features, lip anatomy, and personal preference.
A general rule of thumb is to start with a small amount of filler and gradually add more as needed. This approach allows for a natural-looking enhancement without overfilling or causing discomfort.
Lip fillers with lower water content, such as hyaluronic acid (HA) and calcium hydroxylapatite (CaHa), are preferred over those with higher water content, like poly-L-lactic acid (PLLA). Lower water content lip fillers tend to be more stable, longer-lasting, and less prone to causing side effects.
Hyaluronic acid fillers, for example, have a lower water content compared to other types of fillers. This makes them ideal for creating subtle, natural-looking enhancements without causing excessive swelling or bruising.
CaHa fillers also have a lower water content and are known for their ability to provide long-lasting results, often up to 18 months. They are particularly effective in creating volume and definition, especially in the upper lip area.
When choosing a lip filler with lower water content, it’s essential to consider the specific brand and formulation used. Some popular brands that offer low-water-content fillers include Juvederm, Restylane, and Belotero.
To determine the right volume of lip filler for your individual needs, consult with a qualified healthcare professional or board-certified dermatologist who specializes in cosmetic treatments. They will assess your facial features, lip anatomy, and personal preferences to provide personalized recommendations.
A comprehensive consultation will also help identify any potential contraindications or risks associated with lip fillers. This ensures that you receive the most effective and safe treatment possible.
During the procedure, your healthcare professional will use a topical anesthetic to minimize discomfort and inject the filler using a small needle. The entire process typically takes about 15-30 minutes per area being treated.
After the treatment, it’s essential to follow post-procedure instructions carefully to ensure optimal results and minimize side effects. This may include avoiding strenuous activities, applying ice packs to reduce swelling, and scheduling follow-up appointments for maintenance treatments.
Lip fillers with lower water content can be a safe and effective way to enhance the appearance of your lips, but it’s crucial to choose the right volume to achieve a natural-looking result. By consulting with a qualified professional and following proper aftercare instructions, you can enjoy beautiful, plump lips that are tailored to your unique needs and preferences.
Additionally, consider factors such as lip shape, lip size, and facial structure when selecting the ideal lip filler volume. For example, if you have thin or small lips, a smaller amount of filler may be sufficient to create a natural-looking enhancement, while larger lips may require more filler to achieve balance and proportion.
It’s also essential to remember that lip fillers are temporary and may need to be repeated every 6-12 months to maintain the desired results. This allows for flexibility and the ability to adjust your treatment as needed.
In conclusion, choosing the right volume of lip filler requires careful consideration of individual factors, including facial features, lip anatomy, and personal preferences. By selecting a lower water-content filler and consulting with a qualified professional, you can enjoy beautiful, long-lasting results that enhance the natural beauty of your lips.
No matter what type of lip filler you choose, it’s essential to select the right volume for optimal results.
Lip fillers are designed to restore lost facial volume and give your lips a plumper appearance.
However, choosing the wrong volume can lead to unnatural-looking results or an over-filled appearance, which may require more correction than expected.
Calcium hydroxylapatite-based fillers, like *_Radiesse_* and *_Radiance_*, typically require less volume for similar results due to their denser composition, as recommended by the FDA.
This is because calcium hydroxylapatite fillers have a more uniform particle size, which allows them to hold their shape and provide longer-lasting results with fewer injections.
In contrast, hyaluronic acid-based fillers like *_Restylane_* or *_Juvederm_* may require slightly more volume for the same effect due to their more porous structure.
On the other hand, poly-L-lactic acid (PLLA)-based fillers like *_Sculptra_* typically require less volume upfront but may require multiple injections over time to maintain the desired results.
To determine the right volume for your lip filler treatment, it’s essential to consult with a qualified and experienced healthcare professional or a licensed aesthetician.
They will assess the natural shape and structure of your lips, taking into account factors such as the size and shape of your mouth, facial features, and personal preferences.
Using their expertise and guidance, they can help you select the most suitable lip filler volume for your individual needs and goals.
This will ensure that you receive a natural-looking result that enhances your appearance without appearing unnatural or overly dramatic.
It’s also important to note that some people may require more volume than others due to factors such as age, weight, or smoking habits.
Conversely, younger individuals or those with naturally fuller lips may require less volume for the same effect.
Pre-treatment planning is crucial to achieving optimal results and minimizing any potential complications.
Your healthcare professional or aesthetician will typically use a 3D lip contouring analysis or a lip filler simulation treatment to help determine the ideal volume for your individual needs.
This allows them to visualize how different volumes of filler would look on you and make adjustments as needed before proceeding with the actual treatment.
Throughout the process, open communication is key to ensuring that you’re satisfied with the final result and feel confident in your appearance.
By working closely with a qualified healthcare professional or aesthetician, you can achieve natural-looking lip filler results that enhance your beauty without compromising your lifestyle or daily activities.
Read more about K Aesthetics Studio here. Read more about Melissa Neufeld here. Read more about Aron Marquez here. Read more about Pretty Little Answers here. Read more about Cycle for Azaylia here.